
“AWS API Gateway & Lambda: From Beginner to Expert"

What is API Gateway? Why and How?
AWS API Gateway is a fully managed service that acts like a smart receptionist for your backend. It receives requests from clients, validates and transforms them if needed, and then forwards them to your backend (like a Lambda function). It also handles scaling, security, monitoring, and versioning automatically.
Think of it as the front door to your application.
Why use API Gateway?
Scalability → Handles thousands of requests per second without you worrying about servers.
Security → Supports authentication, authorization, throttling, and access control.
Efficiency → Lets you run multiple API versions (dev, test, prod) easily.
Monitoring → Integrated with CloudWatch for metrics and logging.
Flexibility → You can transform requests/responses before they reach or leave your backend.
How does it work?
API Gateway acts as a reverse proxy, accepting API calls from clients and routing them to the appropriate backend serviceLambda, EC2, HTTP endpoint, or other AWS services.
Understanding API Methods
| Method | Description |
|---|---|
| GET | Retrieves data (read-only) |
| POST | Submits data to create resources |
| PUT | Updates or creates a resource |
| DELETE | Removes a resource |
| PATCH | Applies partial updates |
Tutorial: Creating Your First API with Lambda
Step 1: Create a Simple Lambda Function
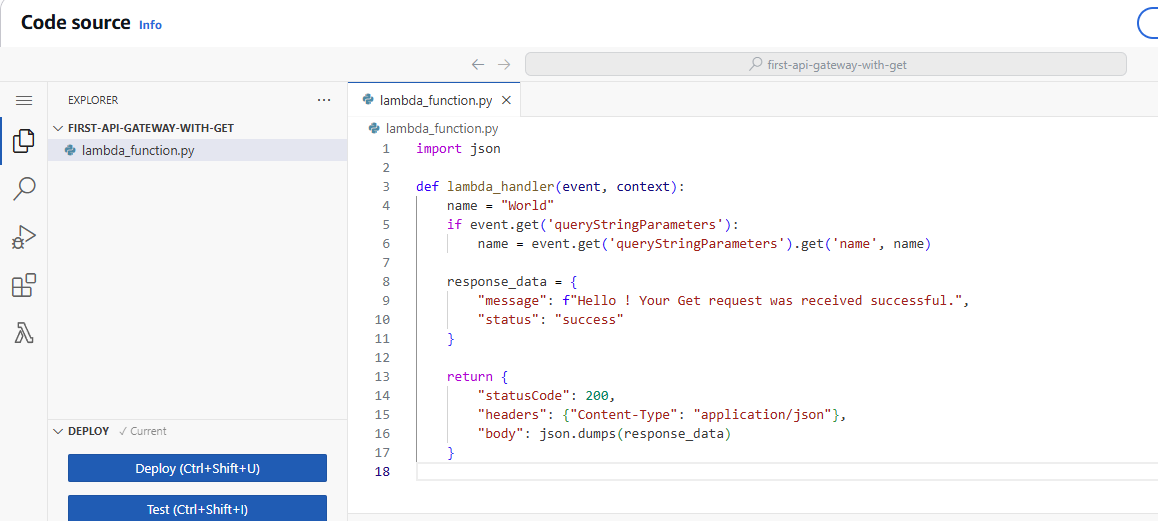
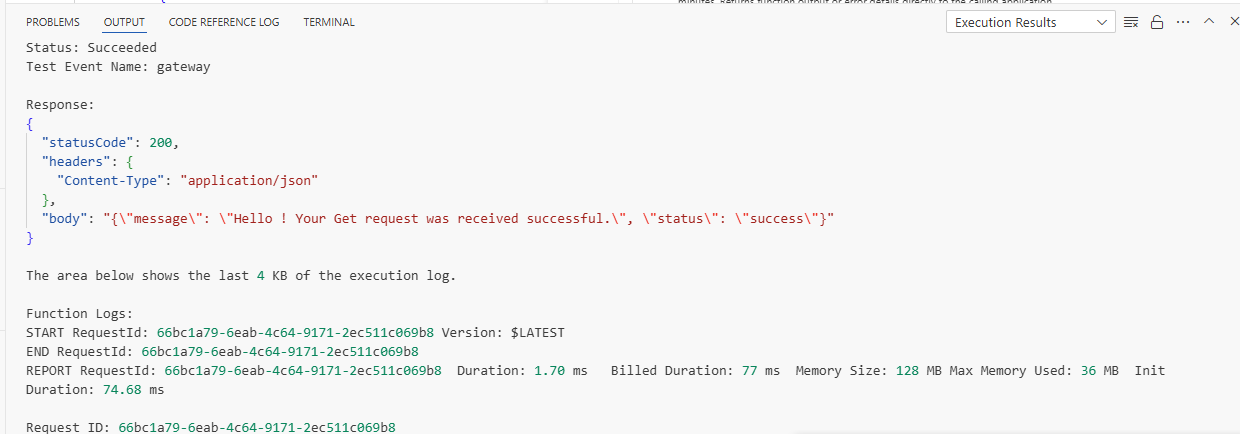
In the AWS Lambda console, create a new Python function and use this code:
import json

def lambda_handler(event, context):
    name = "World"
    if event.get('queryStringParameters'):
        name = event.get('queryStringParameters').get('name', name)

    response_data = {
        "message": f"Hello ! Your Get request was received successful.",
        "status": "success"
    }

    return {
        "statusCode": 200,
        "headers": {"Content-Type": "application/json"},
        "body": json.dumps(response_data)
    }
Step 2: Create a REST API in API Gateway
Go to the API Gateway Console and click Create API.
Choose HTTP API, then click Build.
Select New API, name it (e.g., InfraOps API), and click Create API.
Leave the stage name to $default
review and create.
Create Integration: An API gateway has been created, but it has not been integrated with Lambda. To begin the integration with Lambda, we must first create a route. These routes will define where you can get the Get API.
🔹 Step 2: Define a Route
In your API, go to Routes -> Click Create.
Choose:
- Method:
GET
- Method:
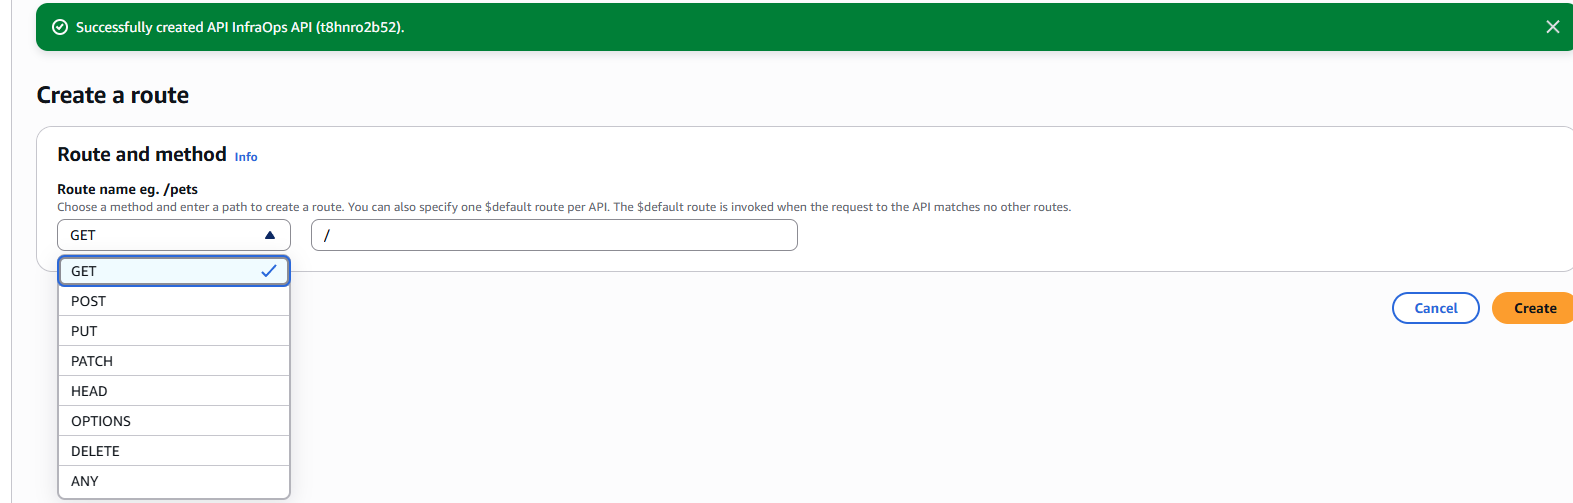
- Click Create.
🔹 Step 3: Create Integration
- Go to routes > Integrations -> Click Attach Integration.
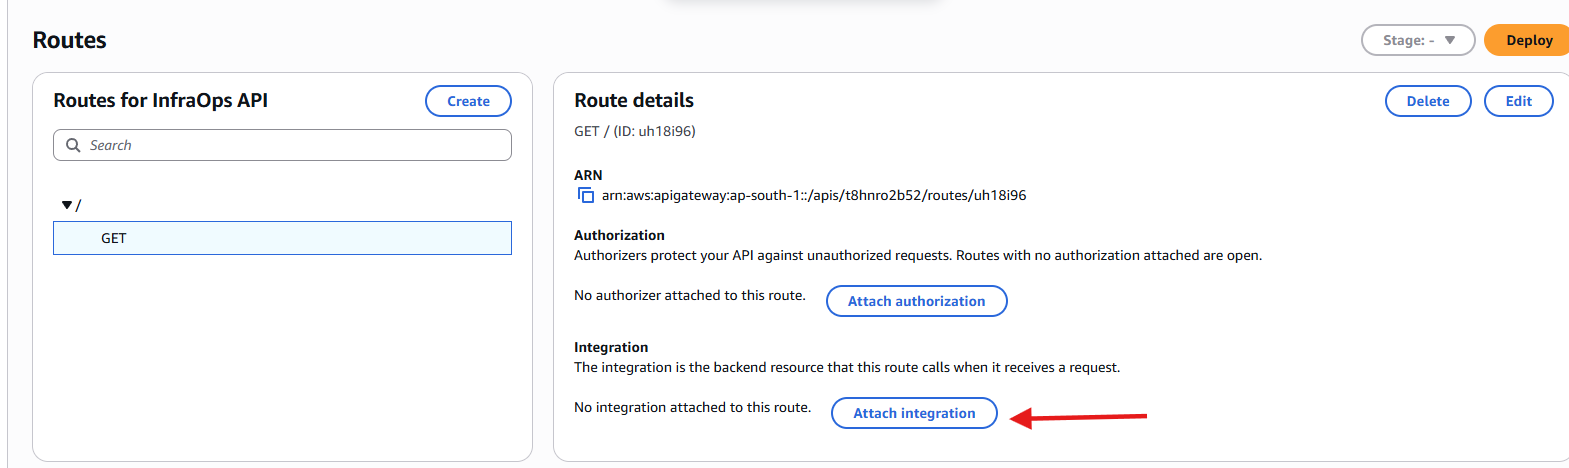
Create and attach an integration.
Choose your backend: Lambda function → if you want serverless logic.
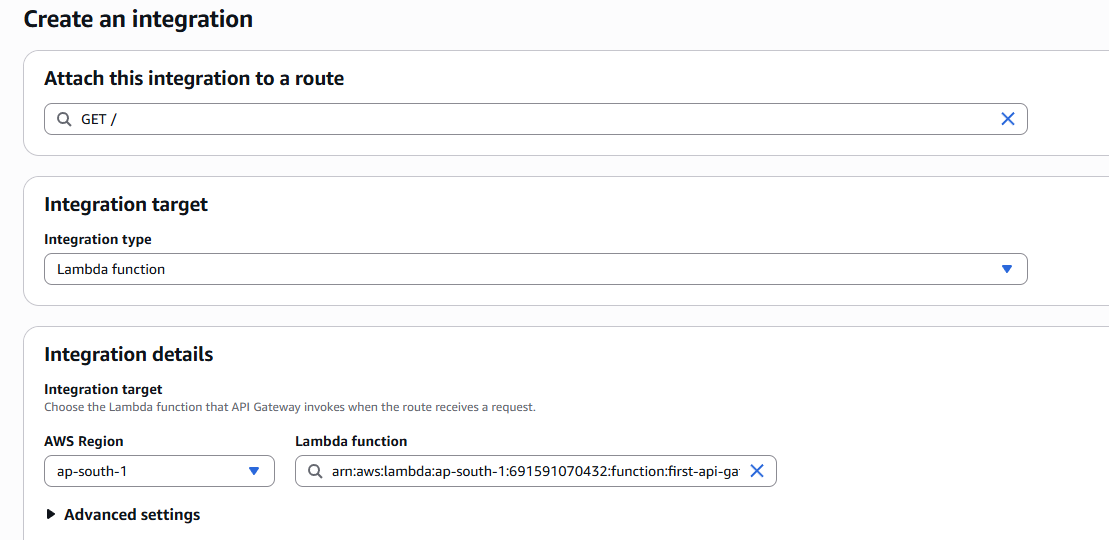
- Select the resource (e.g., your Lambda function "name") and click create.
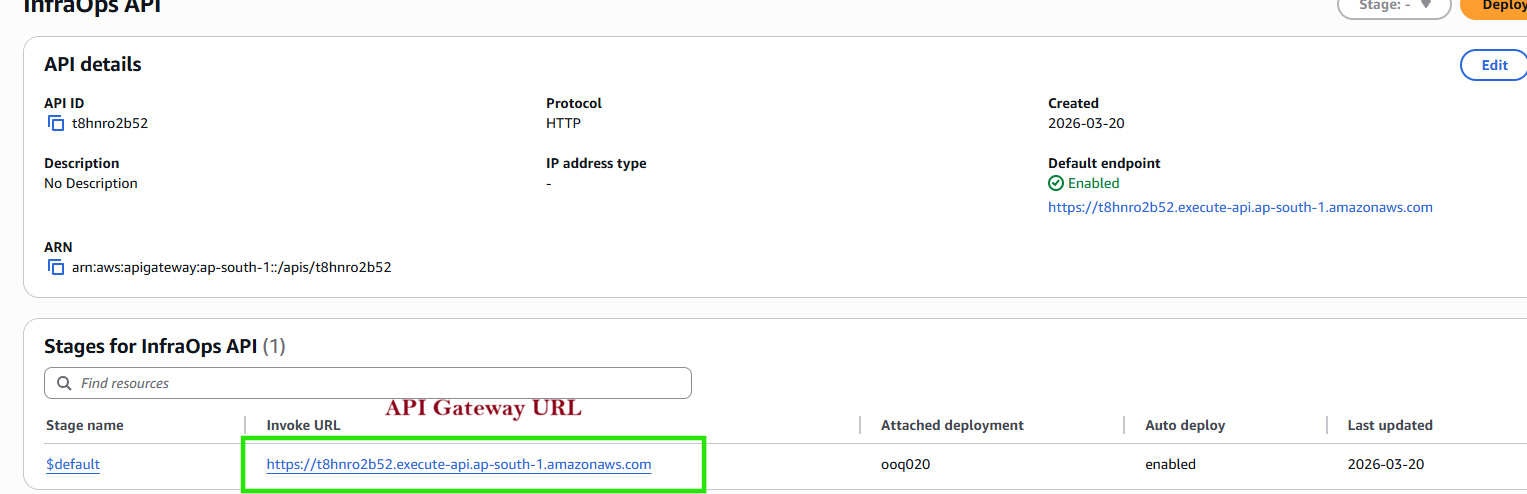
Test the Endpoint
Once you’ve deployed your API to API Gateway, AWS provides an Invoke URL for the stage. To test it in your browser: Copy the Invoke URL from the Stages section of your API Gateway. Paste this full URL into your browser’s address bar and hit Enter. You should see the response returned by your integration (Lambda, HTTP backend, etc.).

Here’s what’s happening under the hood when you hit your GET API Gateway endpoint:
HTTP Request → You send a GET request to the API Gateway Invoke URL.
API Gateway Route → The request is matched to the route you defined (
GET).Integration Trigger → API Gateway invokes the backend integration you attached—in this case, your Lambda function.
Lambda Execution → The Lambda runs your code, processes the request, and generates a response (JSON in your example).
API Gateway Response → API Gateway takes the Lambda’s output and returns it as an HTTP response to the client (browser, curl, Postman, etc.).
Client → API Gateway → Lambda → Response → Client
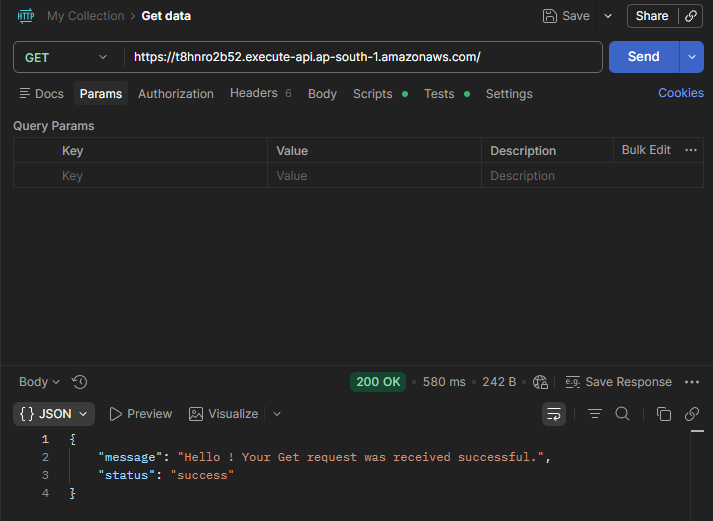
Accessing an API Gateway endpoint with a browser works fine for GET requests, since they don’t require a payload. However, for methods like PUT, POST, and PATCH, you need to send a request body (payload). Because browsers aren’t designed for that, you should use tools such as Postman or curl to test and validate those API requests.
When you paste the GET API Gateway URL into Postman and send the request, Postman is acting as the client, just like your browser would. The request flows through the API Gateway, triggers your Lambda integration, and returns the JSON response back to Postman:
📊 HTTP API vs REST API (Robust Comparison)
| Feature / Aspect | HTTP API (General) | REST API (Specific Style of HTTP) |
|---|---|---|
| Definition | Any API exposed over HTTP protocol | A structured API following REST principles |
| Performance | ✅ Faster, lower latency | ❌ Slightly slower due to added features |
| Cost (AWS API Gateway) | ✅ Cheaper, optimized for simple workloads | ❌ More expensive, feature‑rich |
| Simplicity | ✅ Easier to set up, minimal configuration | ❌ More complex, requires resource modeling |
| Resource Modeling | ❌ Not enforced | ✅ Strong resource‑based design (nouns, CRUD) |
| Request/Response Mapping | ❌ Limited | ✅ Full mapping templates supported |
| Security Options | ✅ Native JWT/OAuth2 support | ✅ API Keys, IAM, custom authorizers |
| Usage Plans & Quotas | ❌ Not supported | ✅ Supported (rate limiting, quotas) |
| Stage Variables | ❌ Not supported | ✅ Supported (environment‑specific configs) |
| CORS | ✅ Native support | ❌ Manual setup required |
| Custom Domains | ✅ Supported | ✅ Supported |
| Best Use Cases | Lightweight microservices, internal APIs, event‑driven apps | Enterprise APIs, public APIs, complex integrations |
| Scalability | ✅ High, but limited advanced controls | ✅ High, with fine‑grained traffic management |
| Developer Experience | ✅ Quick to build and deploy | ❌ More setup, but predictable and standardized |
🔹 Proxy vs Non‑Proxy Integration in API Gateway
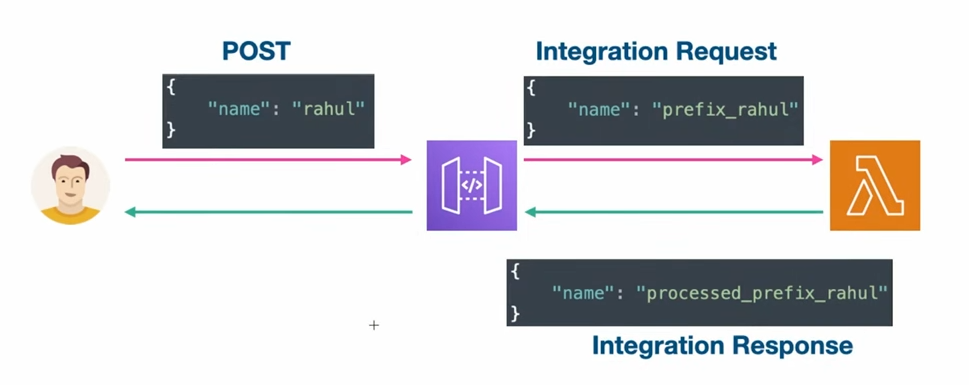
Non‑Proxy Integration
API Gateway can modify requests/responses before sending them to Lambda. You can use mapping templates in Integration Request and Integration Response.
Example: Client sends a payload.
{ "name": "John" }API Gateway adds a prefix →
{ "name": "Prefix_John" }.Lambda processes the modified payload.
Advantage: It gives you flexibility to transform inputs and outputs(payload) without touching Lambda.
Proxy Integration
API Gateway forwards the entire request as‑is to Lambda.
Lambda must handle parsing, validation, and response formatting.
Advantage: Simpler setup, full control inside Lambda.
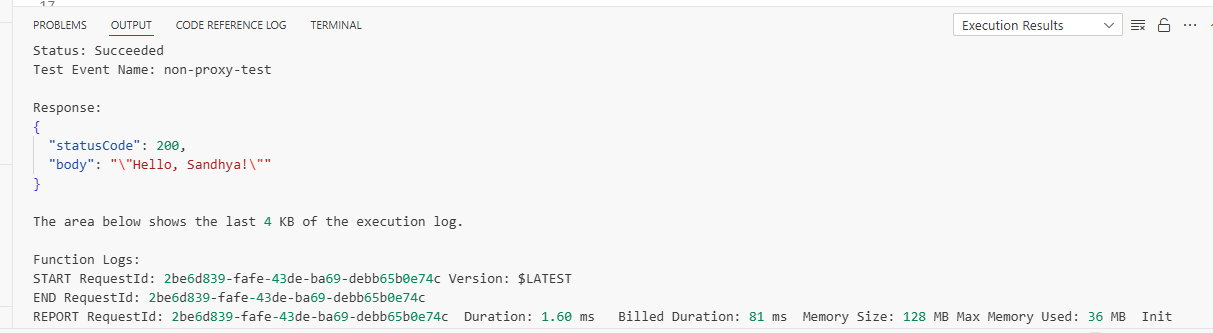
Create a Lambda function - non-proxy-lambda-processor
import json

def lambda_handler(event, context):
    # Try to get 'name' directly from event
    name = event.get('name')

    # If not found, check query string parameters
    if not name:
        params = event.get('queryStringParameters', {})
        name = params.get('name', 'World')

    # Return response
    return {
        "statusCode": 200,
        "body": json.dumps(f"Hello, {name}!")
}
The event object is like a dictionary that holds all the data coming from API Gateway.
Inside that event, you’re looking for the key
"name".Whatever value is stored under that key gets assigned to the variable
name.So yes — the value of
"name"is stored in the variable calledname.Later, when you return the response, you’re printing out that variable’s value.
deploy and test
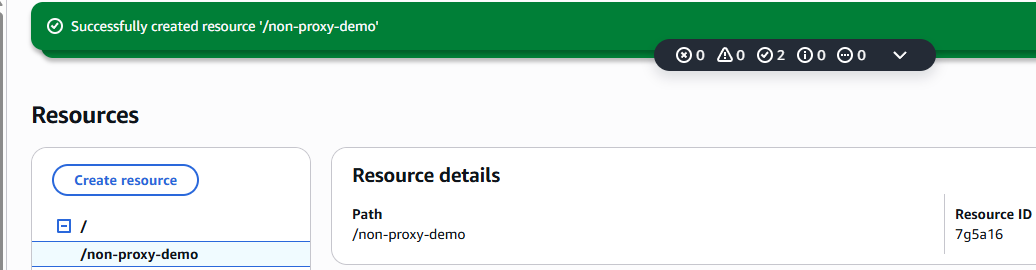
Create API → In API Gateway, choose REST API and give it a name.

Create Resource → Define a resource name. Successfully created resource '/non-proxy-demo'
Create Method → Attach an HTTP method (GET, POST, PUT, DELETE) to the resource.
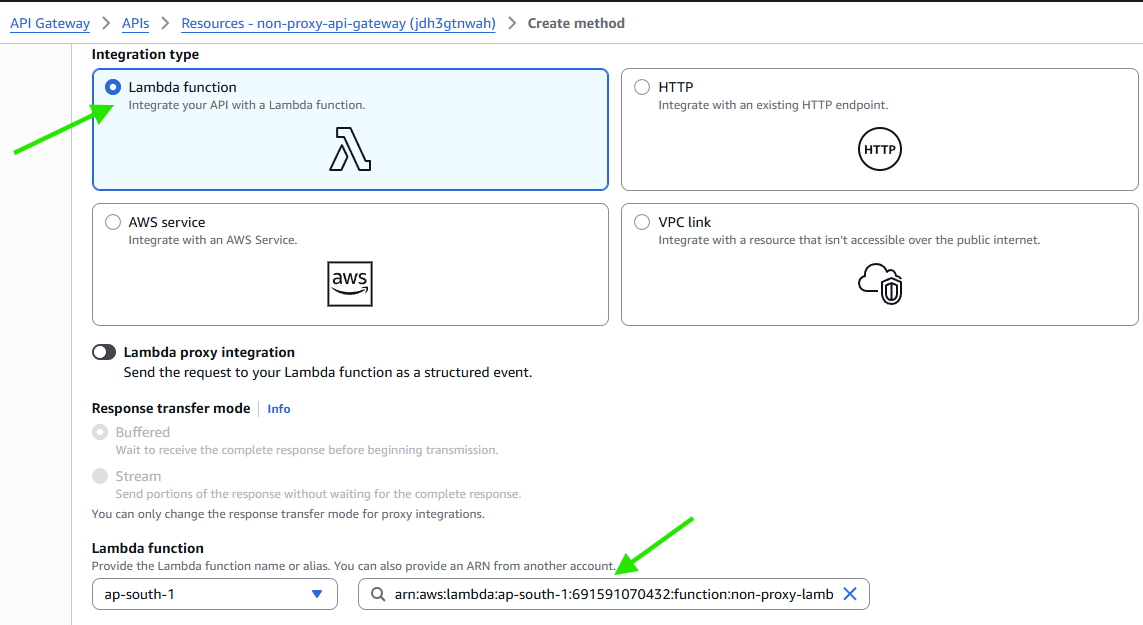
Successfully created method 'POST' in 'non-proxy-demo'. Redeploy your API for the update to take effect.
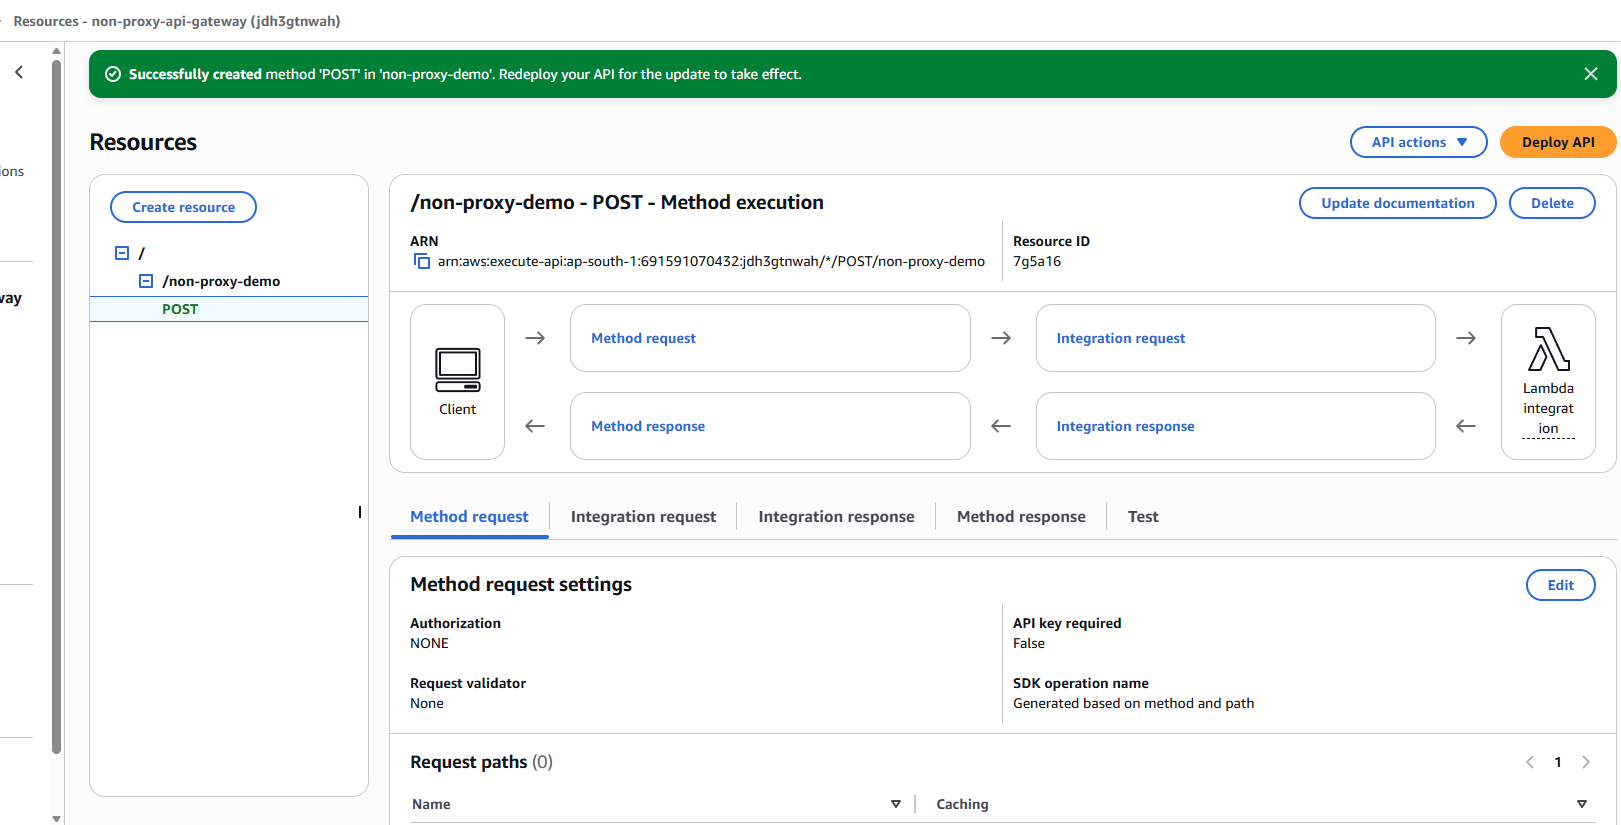
After you create a method (like POST), API Gateway shows the full request flow between client → API Gateway → Lambda → response.
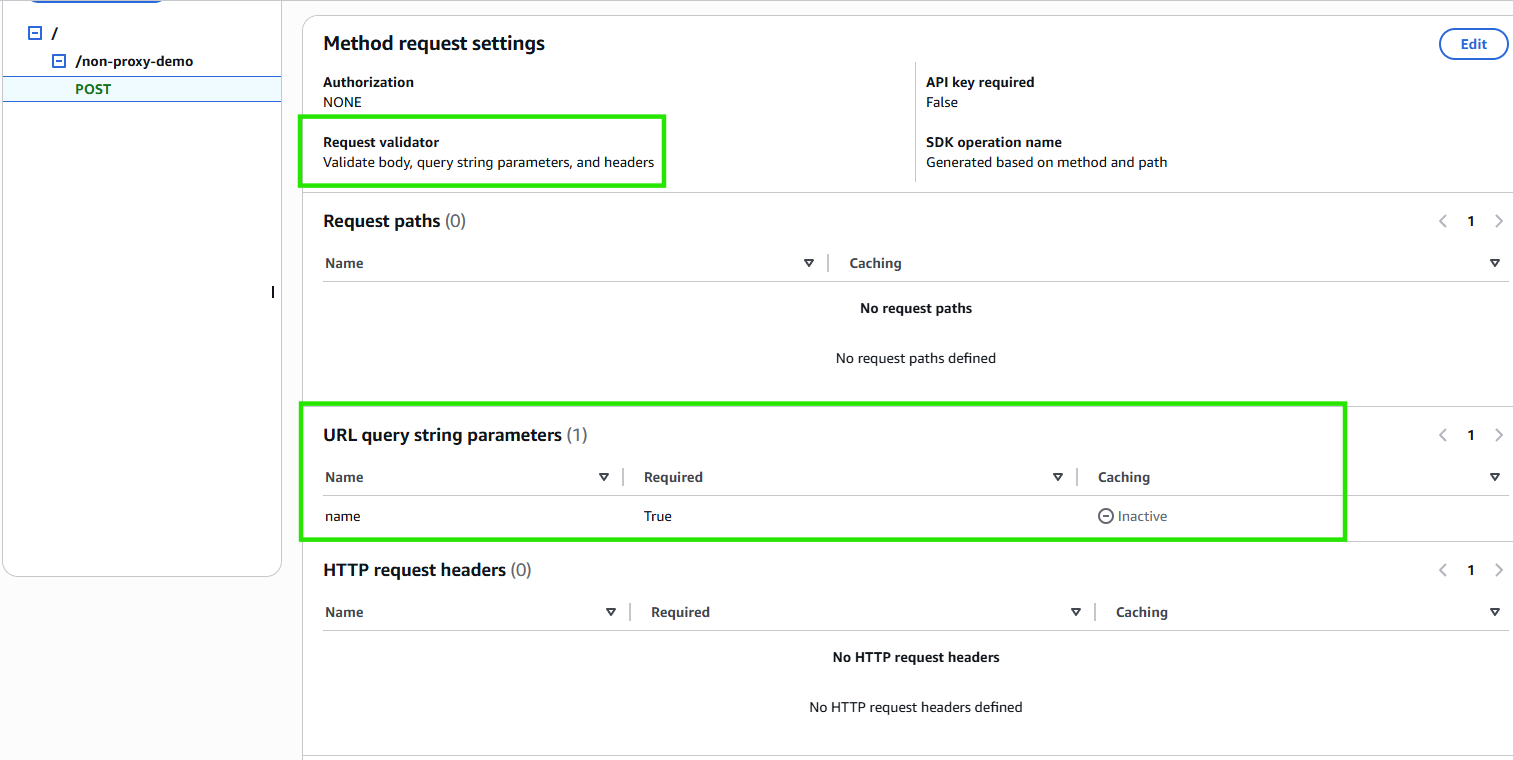
In the Method Request, you can configure things like headers, query string parameters, and request validation.
Example: You add a URL query string parameters called
"name"(e.g.,?name=sandhya) and mark it as required.Once validated, the request goes to Lambda, which processes the payload and returns the response.
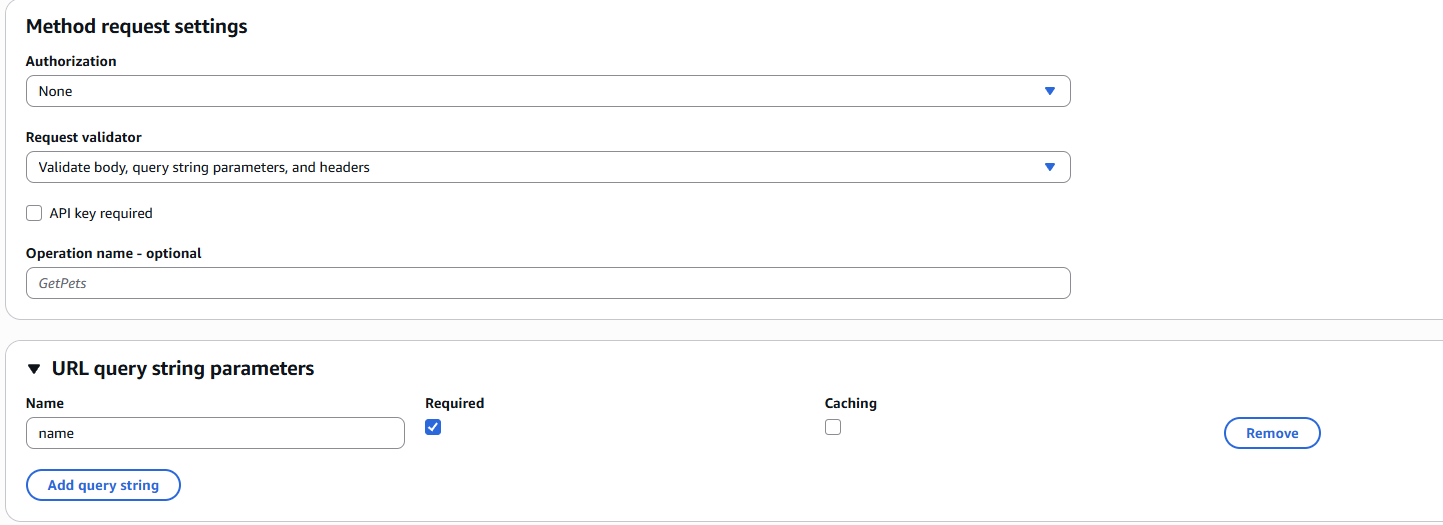
- Successfully edited method request for ‘POST’. Redeploy your API for the update to take effect.
Integration request
Click Edit to configure request details.
Add Mapping Template
Set Content-Type to
application/json.Add the template to transform the request before it reaches Lambda.
Use Template to Modify Request Body
Example (for query string parameter ?name=sandhya):
{
"name": "prefix_${input.params('name')}"
}
- Successfully updated method request settings for 'POST' in 'non-proxy-demo'. Redeploy your API for the update to take effect.
This ensures Lambda receives:
{ "name": "prefix_sandhya" }
Test Before Deploy
Use the built‑in Test option in API Gateway.
Pass query string like
?name=sandhya.Confirm the response shows the prefix added.
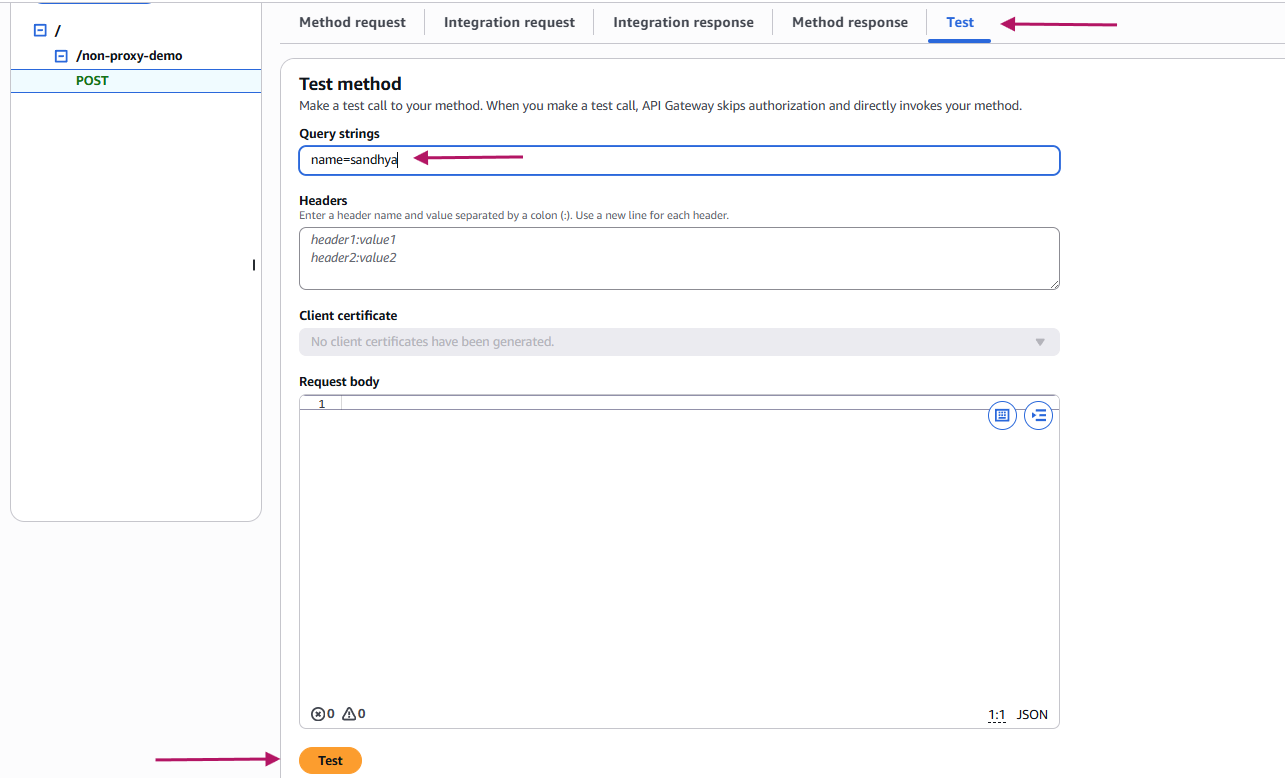
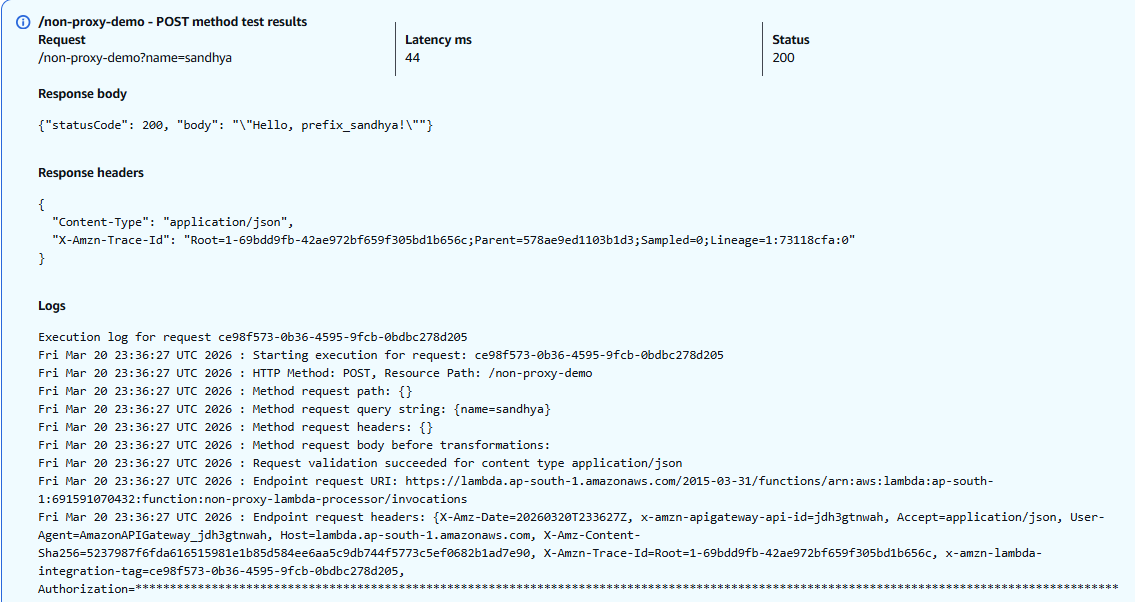
Integration Request → Mapping Template → Modify payload → Lambda processes modified input.
What’s happening step by step
Client request →
/non-proxy-demo?name=sandhyaMethod Request → validates the query string parameter
name.Integration Request → mapping template transforms it into:
{ "name": "prefix_sandhya" }
Lambda execution → reads the name value and returns:
{"statusCode": 200, "body": "\"Hello, prefix_sandhya!\""}
- API Gateway response → sends the JSON back to the client.
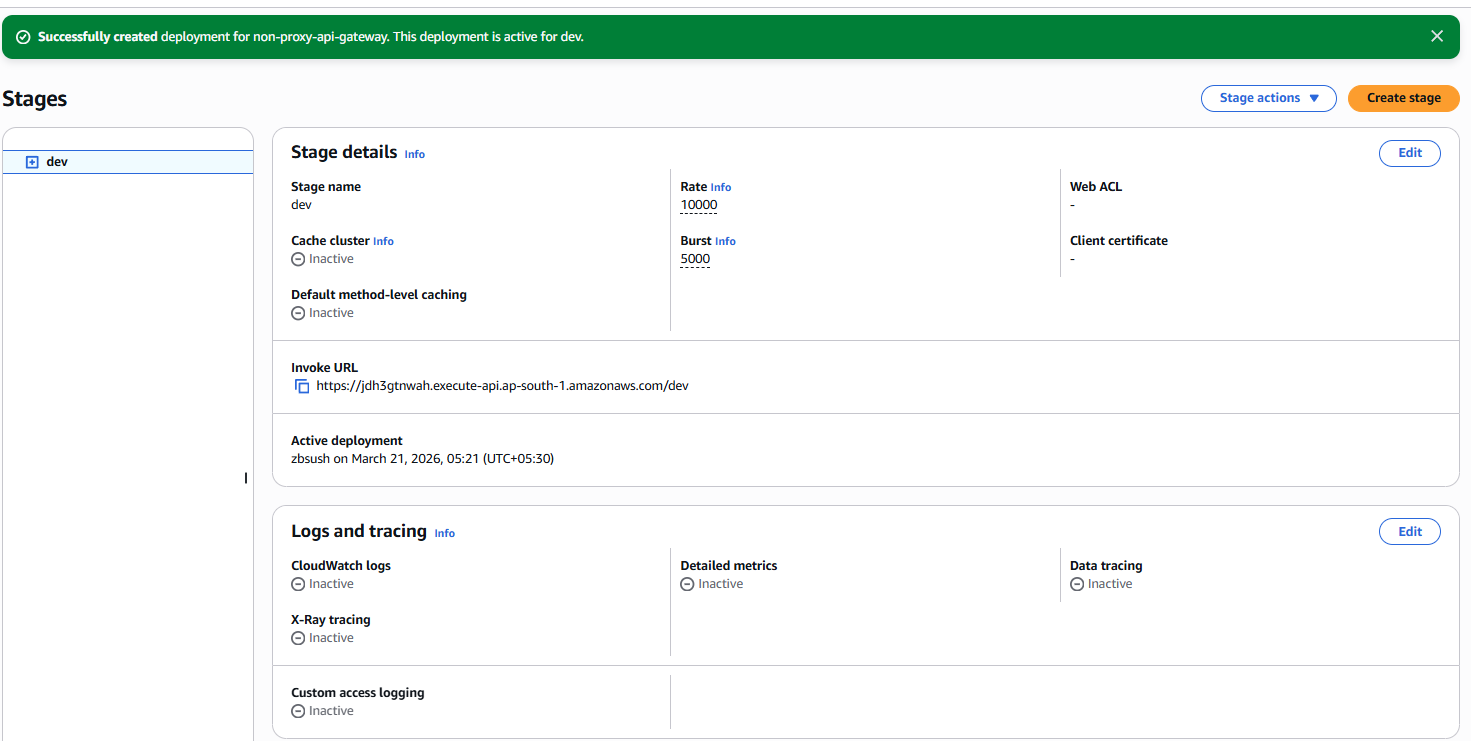
Deploy API
Choose a stage (e.g.,
dev,test,prod).Deploy the API to generate the Invoke URL.
Test with Postman
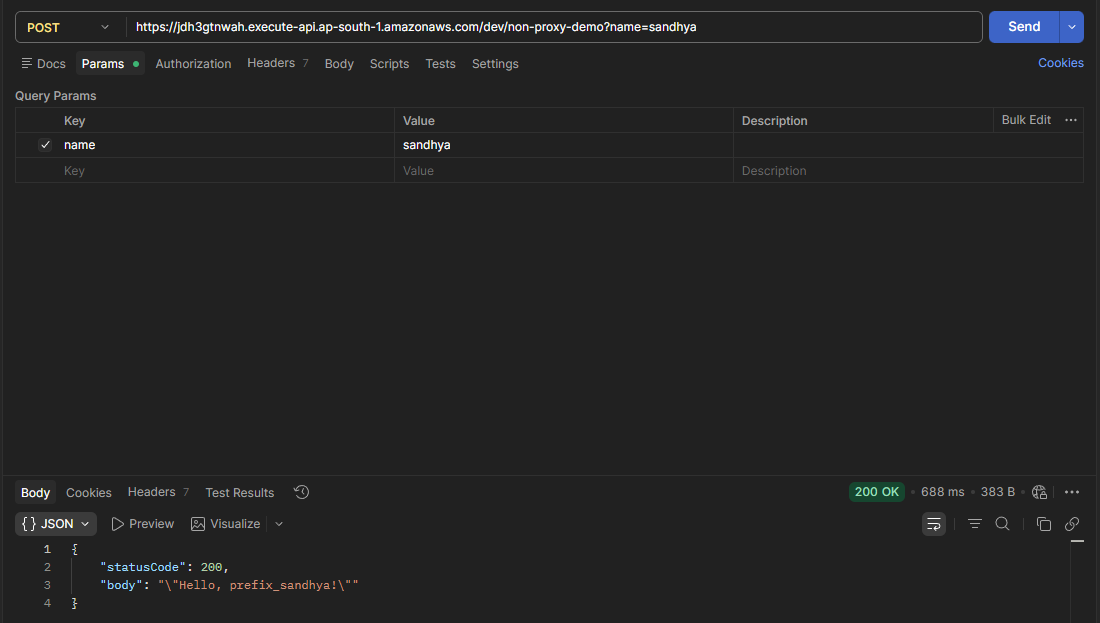
Open Postman → create a new request.
Select POST as the method.
Copy the full Invoke URL from your deployed stage (e.g.,
https://<api-id>.execute-api.<region>.amazonaws.com/dev/non-proxy-demo).
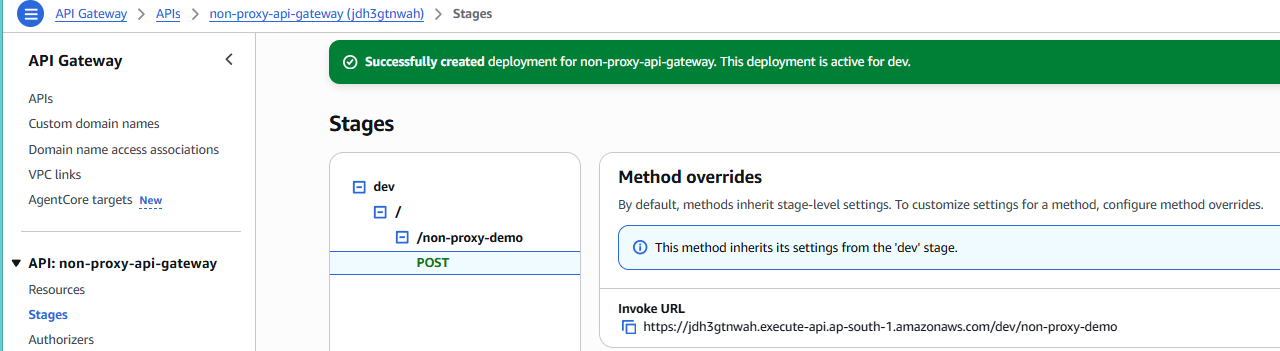
this is the non‑proxy integration flow in API Gateway:
Create a Method
- You added a POST method to your resource
/non-proxy-demo.
Method Request
You defined a query string parameter
name(e.g.,?name=sandhya) and marked it required.You added a request validator to check inputs.
Integration Request
You linked the method to your Lambda function.
You added a mapping template to transform the request before Lambda sees it. {"name": "prefix_${input.params('name')}"}
This means if the client sends ?name=sandhya, Lambda receives: { "name": "prefix_sandhya" }
Tested the request : You ran a test and confirmed Lambda responded with
"Hello, prefix_sandhya!".Deployed to a stage (dev), copied the full Invoke URL, and tested with Postman.
You got the expected response back from Lambda. {"statusCode":200,"body":"Hello, prefix_sandhya!"}
what you did with the Integration Request and the mapping template is essentially pre‑processing the request before it ever reaches Lambda.
Here’s the flow in simple terms:
Client sends request →
/non-proxy-demo?name=sandhyaIntegration Request mapping template → intercepts that request and modifies it (adds
"prefix_"to the name).Lambda receives modified payload →
{ "name": "prefix_sandhya" }Lambda processes → returns
"Hello, prefix_sandhya!"
So yes — the mapping template is where you can add, remove, or transform data before Lambda sees it. That’s the power of non‑proxy integration: you don’t just forward the raw request, you can reshape it to fit exactly what your backend expects.
👉 In short: Method Request validates → Integration Request transforms → Lambda executes.
Clear takeaway
API Gateway = front door to your backend.
Non‑proxy integration lets you control and transform requests/responses before they hit Lambda.
You successfully built, tested, and deployed an API with a dev stage, and confirmed it works via Postman.
Integration Response mapping template in a non‑proxy API Gateway method:
🔹 Step 1: Open Your API
Go to the API Gateway console.
Select your non‑proxy API (the one you created earlier).
Click on the POST method under your resource.
🔹 Step 2: Go to Integration Response
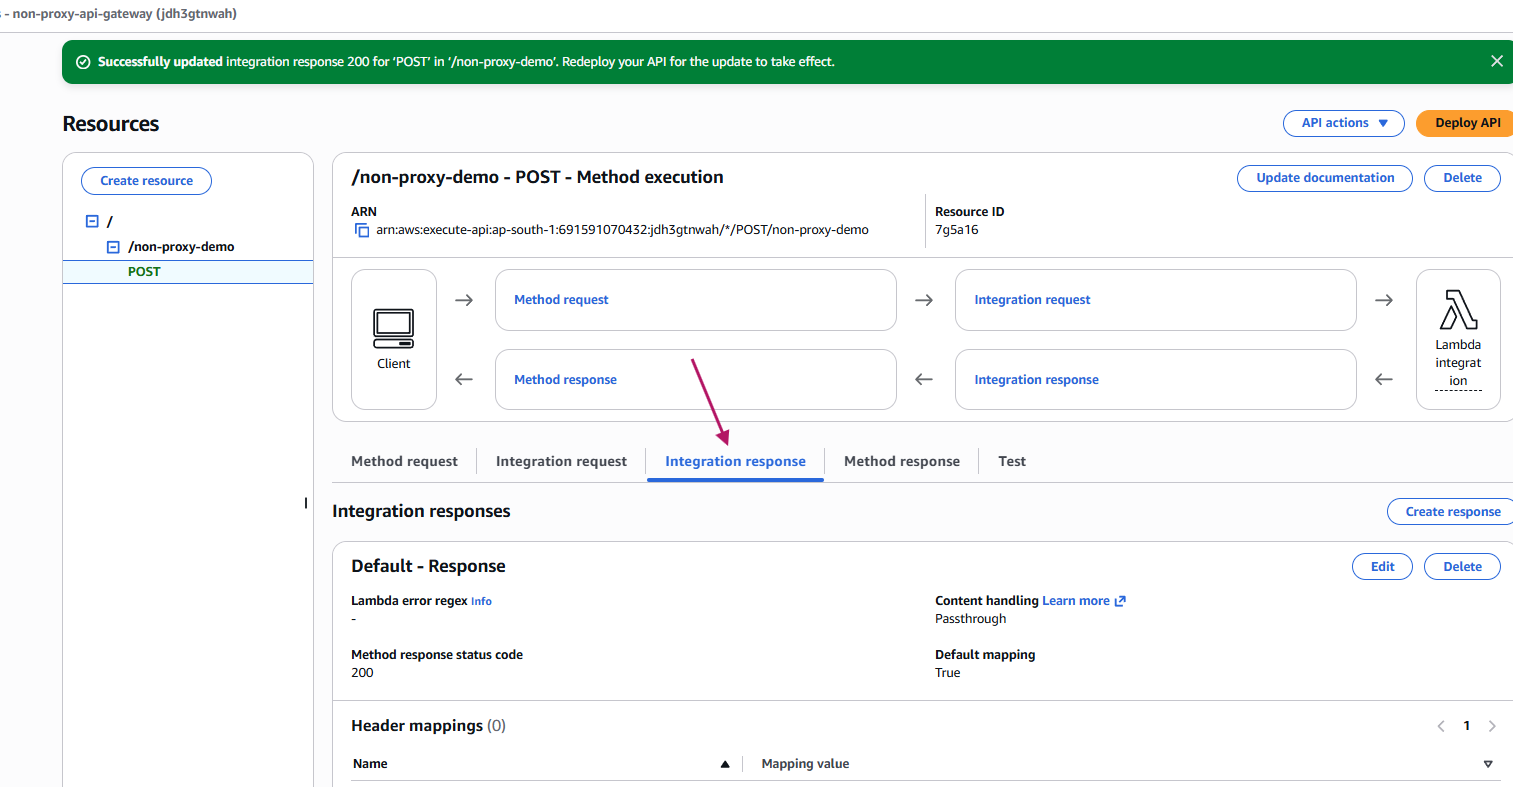
🔹 Step 3: Add a Response Mapping Template
Edit the Integration Response
Click Add Mapping Template.
Enter
application/jsonas the content type.Paste a simple mapping template, for example:
{ "message": \(input.json('\).body') }
🔹 Step 4: Save and Deploy
- Save the template.
🔹 Step 5: Deploy the API
In the API Gateway console, click Actions → Deploy API.
Select your existing stage (e.g.,
dev).Click Deploy.
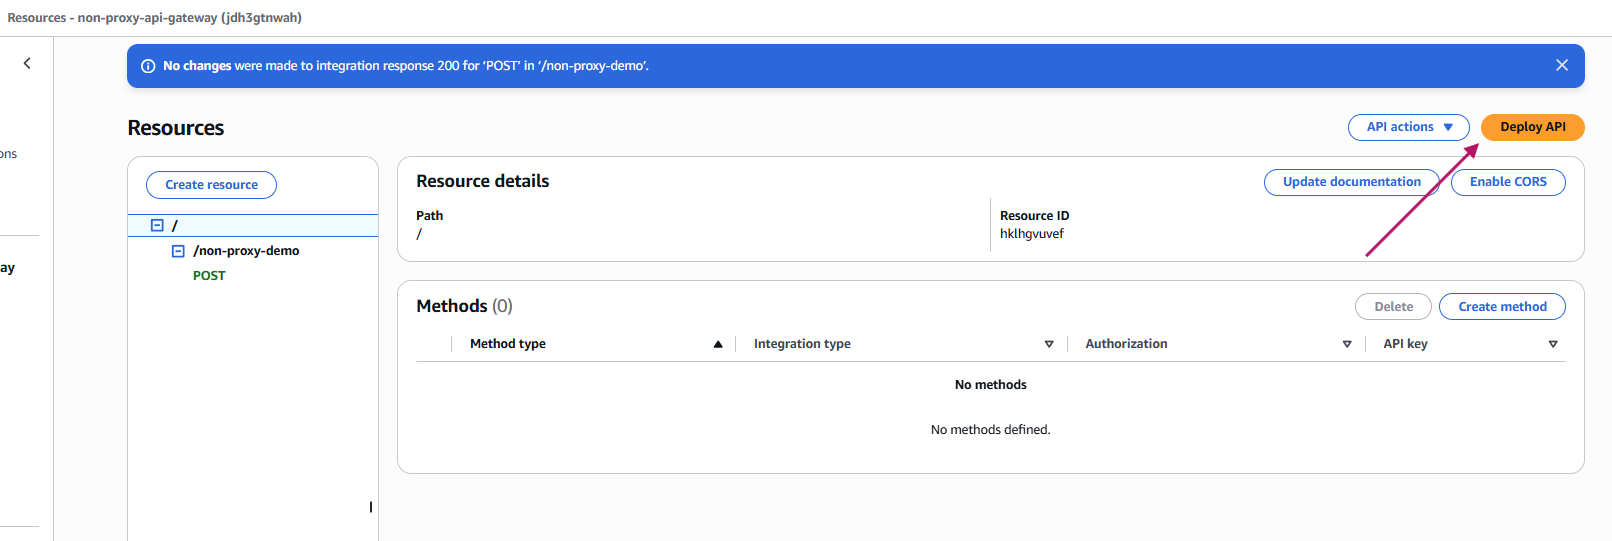
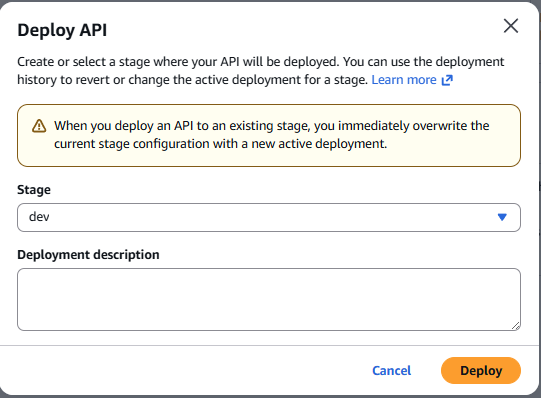

🔹 Step 6: Test the Invoke URL
Now call your endpoint from Postman or curl:
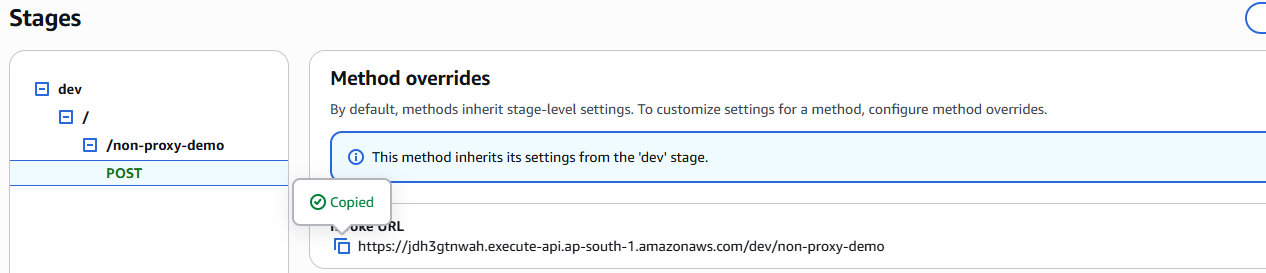
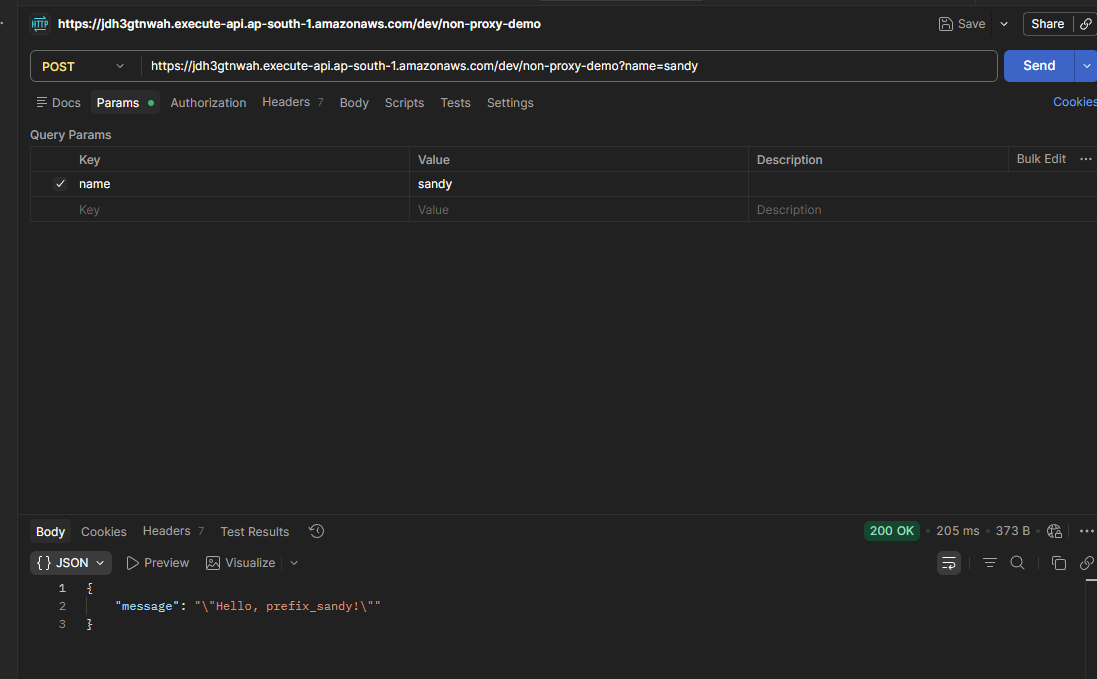
Console Test → instant check, no redeploy needed.
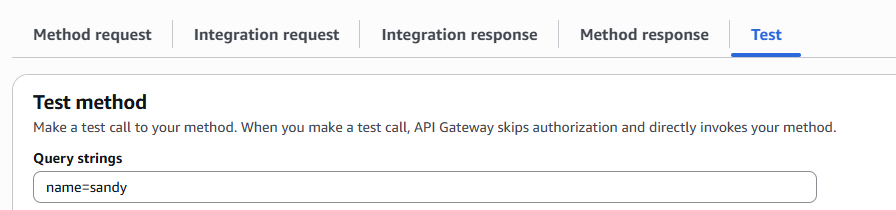
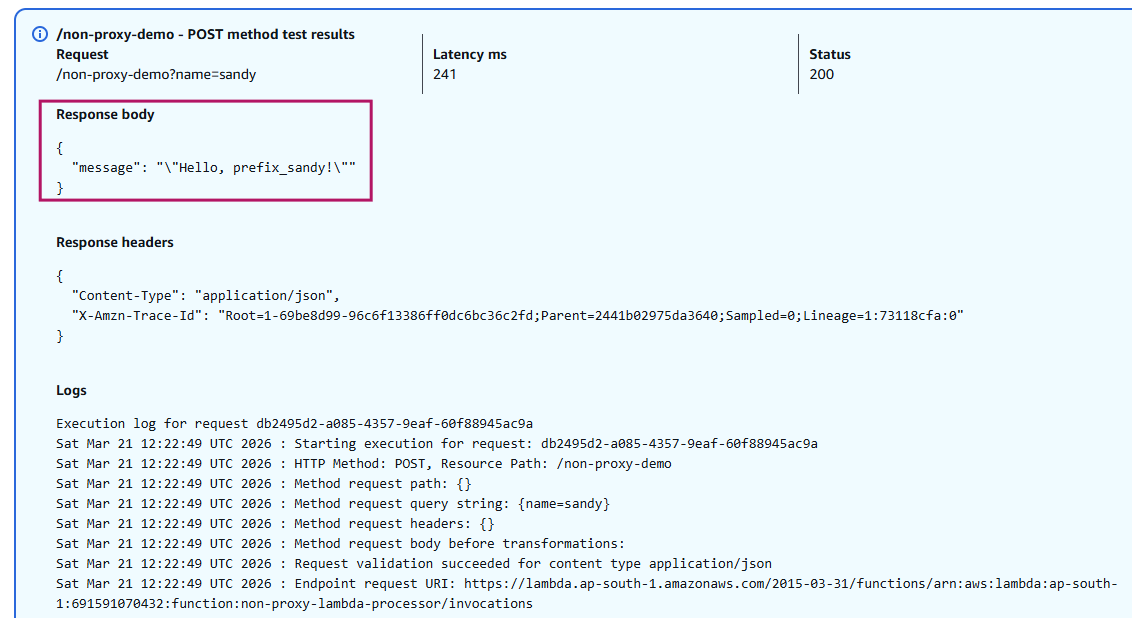
Now lets see the difference between Integration Request and Integration Response
🔹 Flow with your Lambda
Your Lambda looks like this:
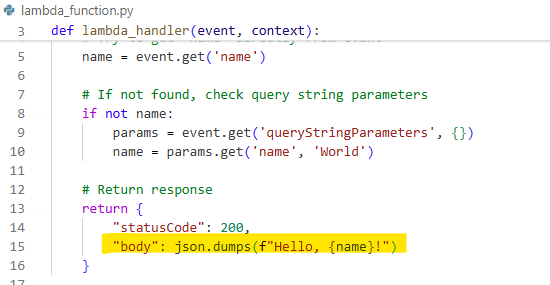
So Lambda always returns a JSON object with a body string that says "Hello, {name}!".
🔹 Integration Request (before Lambda)
Purpose: Change what Lambda receives.
Example: Client calls:
POST /non-proxy-demo?name=sandhya
Request mapping template modifies it:
{ "name": "prefix_sandhya" }
- Lambda receives
name="prefix_sandhya".
{
  "statusCode": 200,
  "body": "\"Hello, prefix_sandhya!\""
}
🔹 Integration Response (after Lambda)
Purpose: Change what the client sees.
Lambda output was:
{
  "statusCode": 200,
  "body": "\"Hello, prefix_sandy!\""
}
# (notice the extra quotes because of json.dumps in your Lambda code).
- Response mapping template added
RESP_prefix_in front:
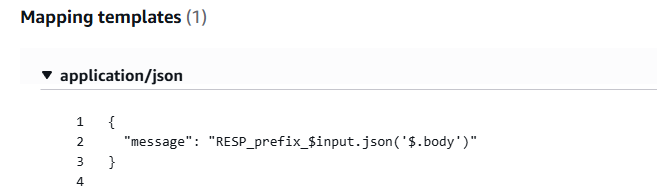
Client finally sees:
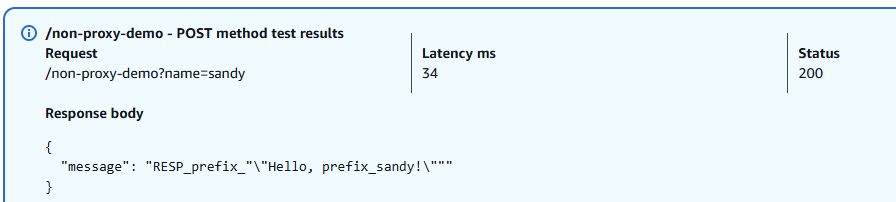
Integration Request is where you added
prefix_before Lambda runs.Integration Response is where you added
RESP_prefix_after Lambda runs.
🔹 Proxy integration
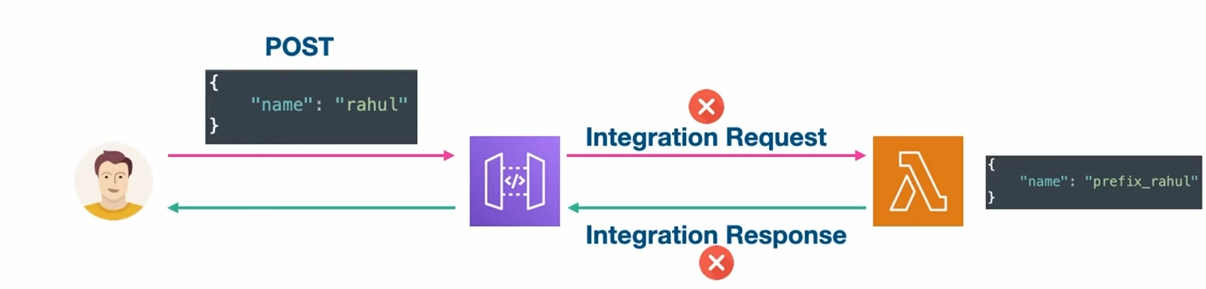
API Gateway forwards the request directly to Lambda and returns Lambda’s response directly to the client.
No mapping templates are available.
If you want to change the response (e.g., add a prefix/suffix, wrap into
{ "message": ... }You must write that logic in the Lambda function itself.
🔹 Steps to create a Proxy API in API Gateway
Create a Lambda function
import json

def lambda_handler(event, context):
    name = event.get('name')

    if not name:
        params = event.get('queryStringParameters', {})
        name = params.get ('name', 'World')

    return {
       "statusCode": 200,
       "body": f"Hello, {name}!"
    }
Create a REST API
In API Gateway, choose Create API → REST API → New API.
Give it a name (e.g.,
ProxyDemoAPI).
Create a Resource
Under your API, create a new resource (e.g.,
/non-proxy-demo).This is the path your clients will call.
Create a Method (POST)
On the resource, add a method → choose POST.
Select Lambda Function as the integration type.
Enable Lambda Proxy Integration.
Pick the Lambda function you created earlier and create.
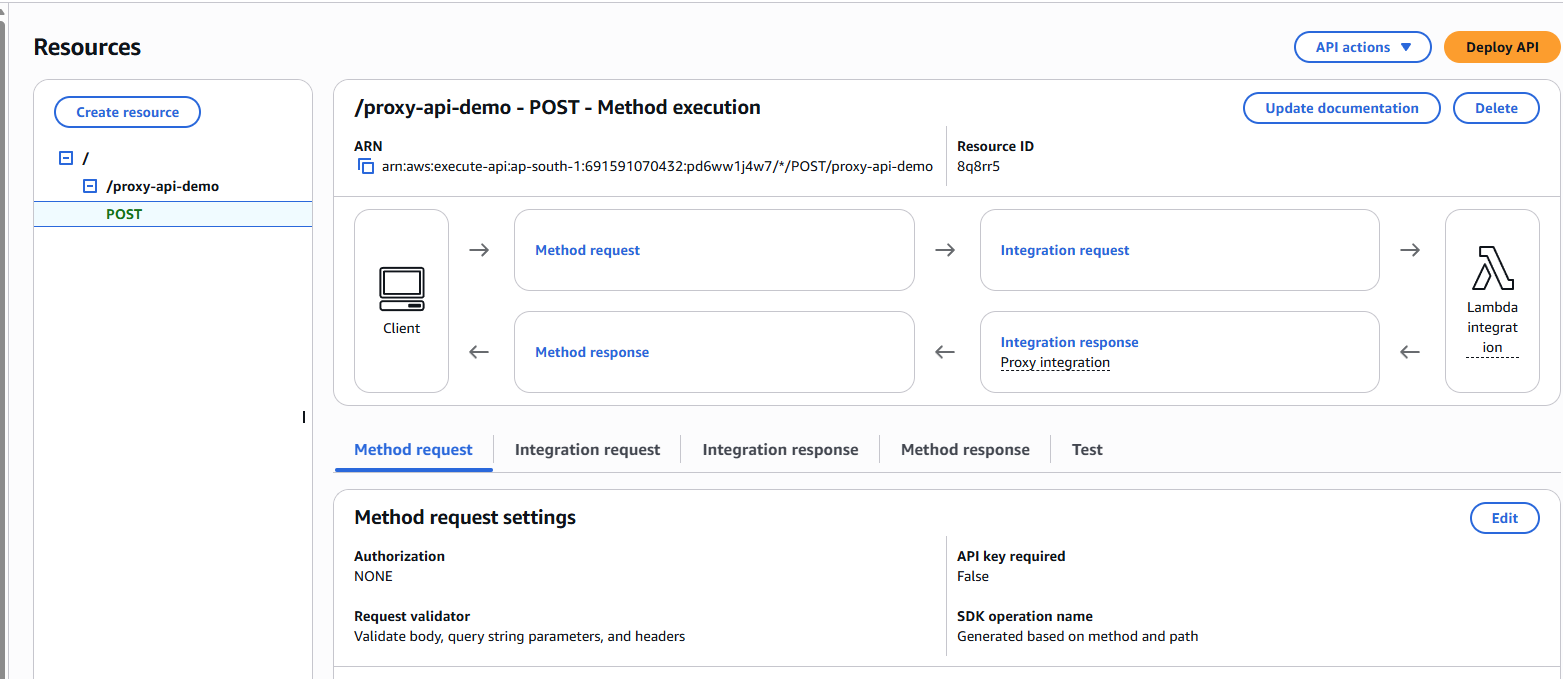
Edit Method Request
Request validator -> Choose Validatebody, query string parameters, and headers
URL query string parameters:
You add a query string parameter called
name.Check “Required.” (Marking a parameter as Required means API Gateway will reject the request if that parameter is missing.)
Now, if a client calls
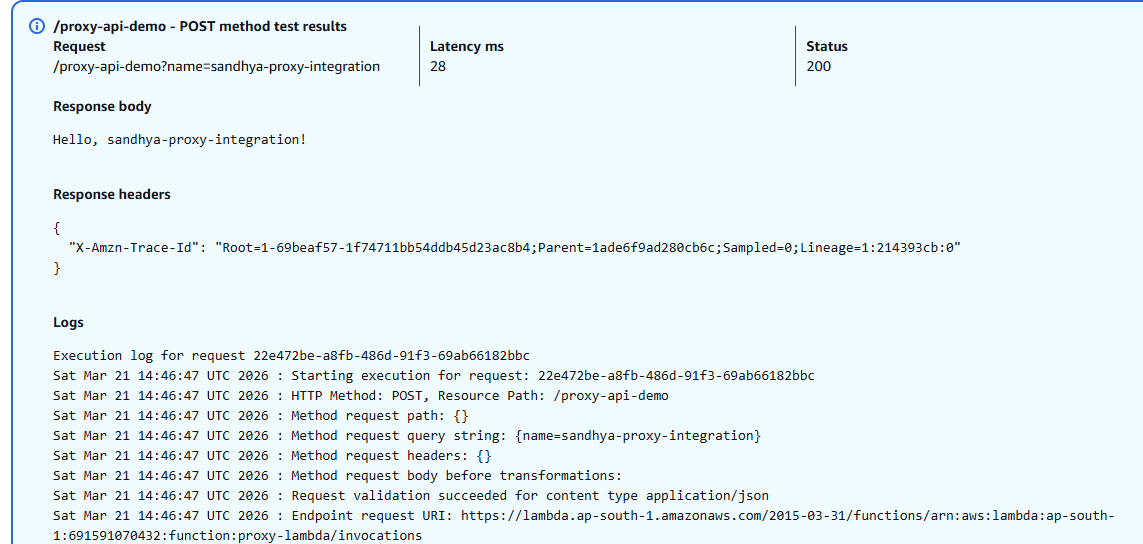
/proxy-api-demowithout?name=sandhya, API Gateway will return a400 Bad Requestbefore Lambda is even invoked.
In Proxy integration, Integration Request mapping parameters are not available because the API request is passed directly to Lambda
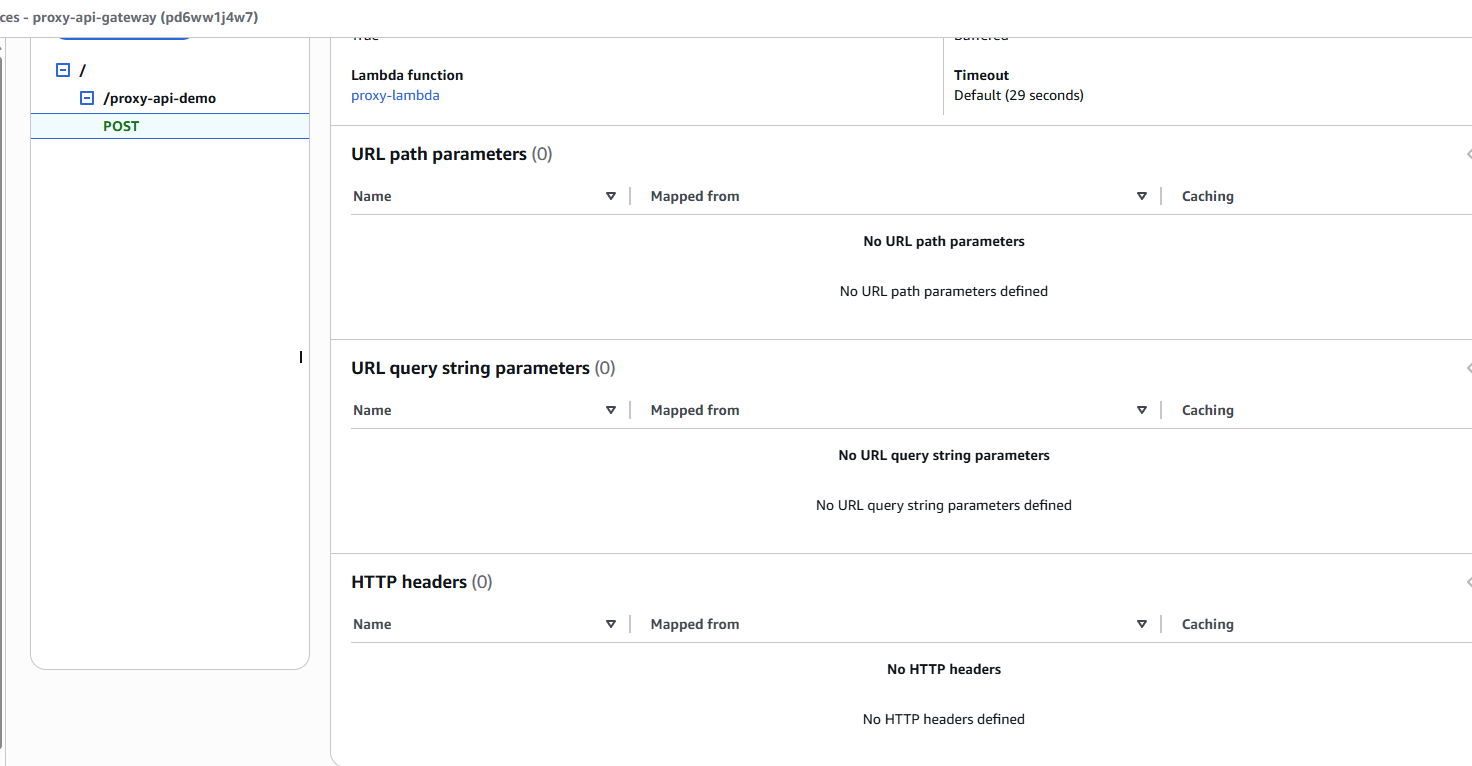
Console test
Deploy the API
Create a new stage (e.g.,
dev).Deploy the API to that stage.

Test the Invoke URL
Now call your endpoint from Postman or curl:
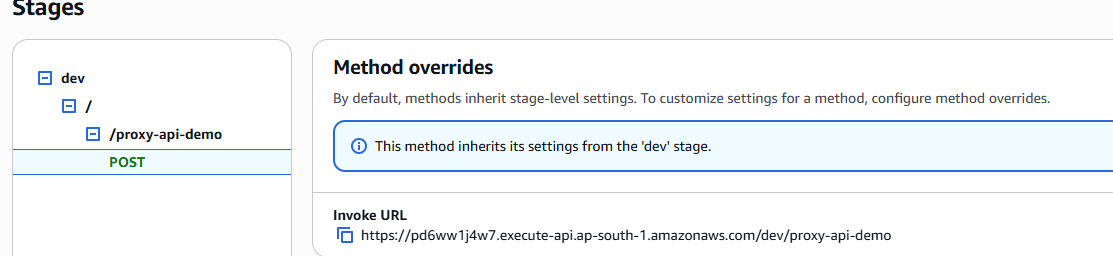
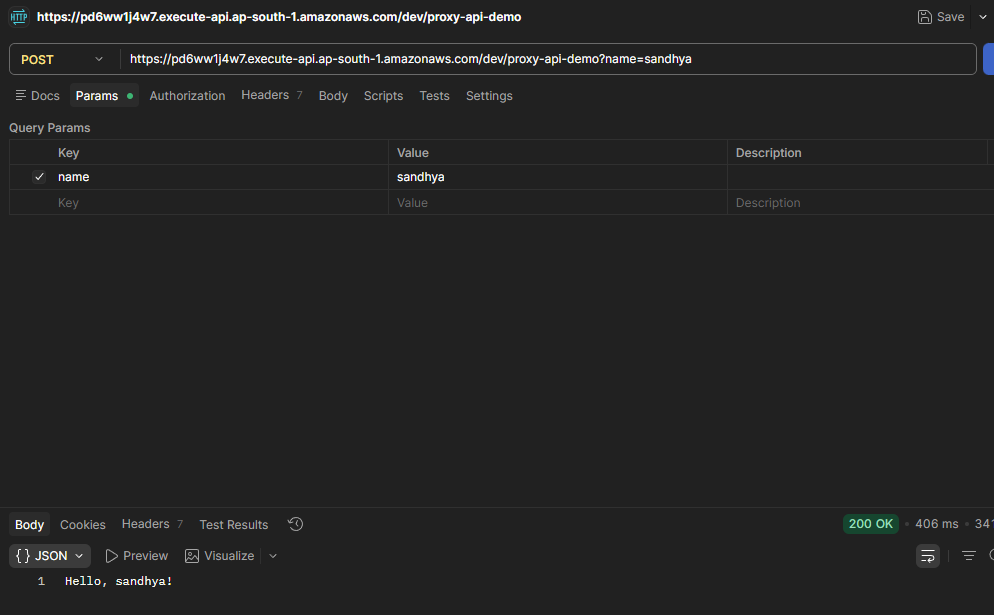
With proxy integration, API Gateway sends the whole request (headers, query string, body) straight to Lambda, and whatever Lambda returns goes straight back to the client.
VALIDATORS: Request, Body, Query string
In API Gateway, validators are the feature that let you check incoming requests before they ever reach your Lambda.
You can define a model (using JSON Schema) that describes the expected structure of the request body — for example, requiring
nameas a string,emailin proper format, andmobileas a number.Then you attach a validator to your method. The validator enforces that the request body matches the model and that required query string parameters or headers are present.
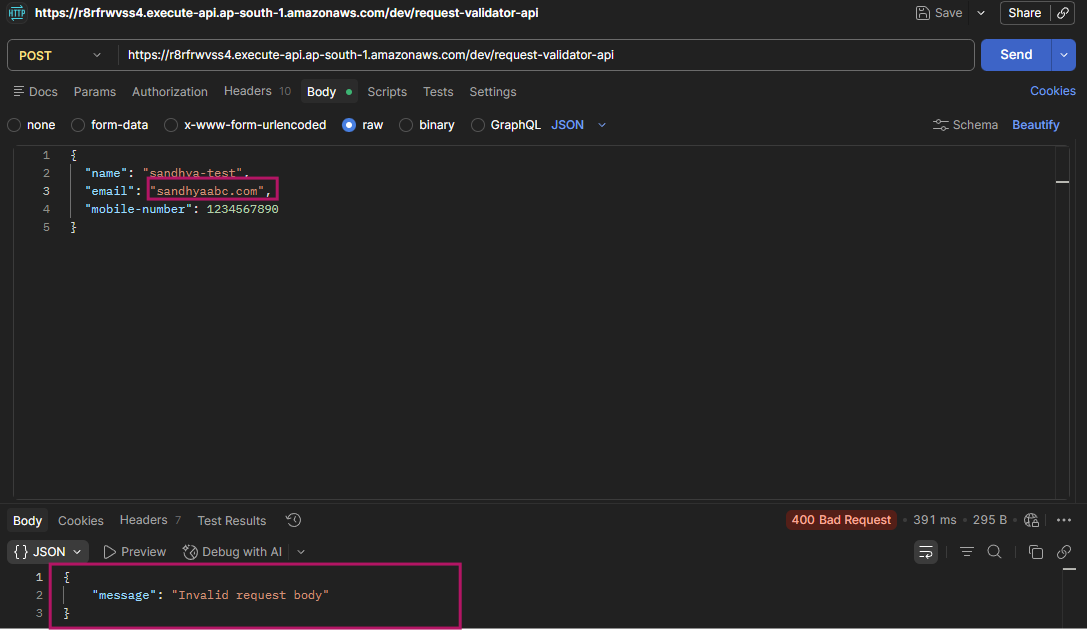
If the request doesn’t match (e.g., email is missing or mobile is not numeric), API Gateway rejects it with a
400 Bad Requestautomatically.Only valid requests are forwarded to your Lambda or backend service, saving you from writing extra validation code inside Lambda.
validators make sure the request body, query parameters, and headers are in the right format before Lambda sees them.
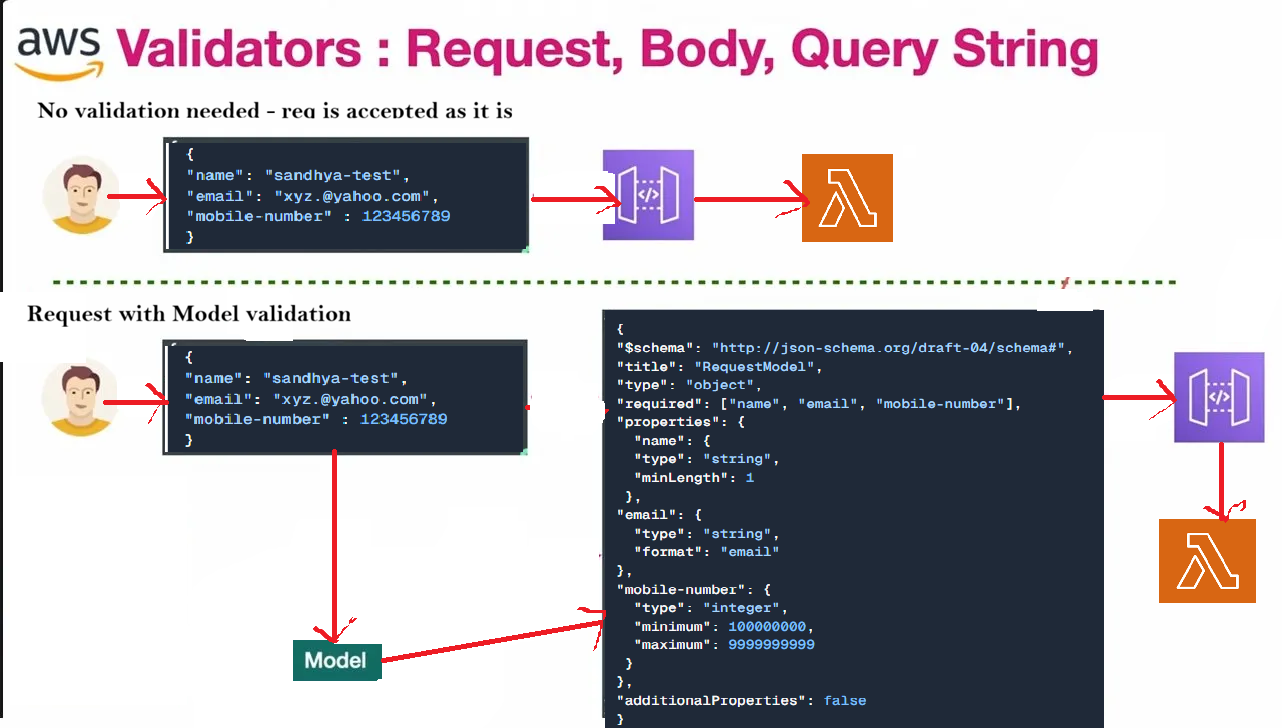
User → Request Body → Model → JSON Schema → API Gateway → Lambda
User sends the same request
This time a Model is attached to the API Gateway
The Model checks the request against the JSON Schema which defines:
namemust be a string with minLength 1emailmust be a valid email formatmobile-numbermust be an integer between 100000000 and 9999999999
If request matches the schema → passes through to Lambda ✅
If request fails the schema → API Gateway rejects it with 400 Bad Request ❌
Top flow = no rules, everything passes. Bottom flow = Model acts as a gatekeeper, only valid requests reach Lambda.
Steps to implement a request validator in API Gateway
Create a Lambda
import json

def lambda_handler(event, context):
    # Parse the incoming request body
    body = json.loads(event.get('body', '{}'))

    return {
        "statusCode": 200,
        "body": f"Request Payload = {body}!"
    }
Create REST API → add a resource → create a method (e.g., POST).
In the left sidebar, go to Models → Create.
Name:
DemoRequestValidatorContent type:
application/jsonAdd your JSON Schema (e.g., requiring
name,email,mobile).
{ "$schema": "http://json-schema.org/draft-04/schema#", "title": "RequestModel", "type": "object", "required": ["name", "email", "mobile-number"], "properties": { "name": { "type": "string", "minLength": 1 }, "email": { "type": "string", "format": "email" }, "mobile-number": { "type": "integer", "minimum": 100000000, "maximum": 9999999999 } }, "additionalProperties": false }- Save.
Go to Edit Method Request for your POST method.
- Under Request Validator, choose Validate body
In Request Body, set:
Content type:
application/jsonModel:
DemoRequestValidator

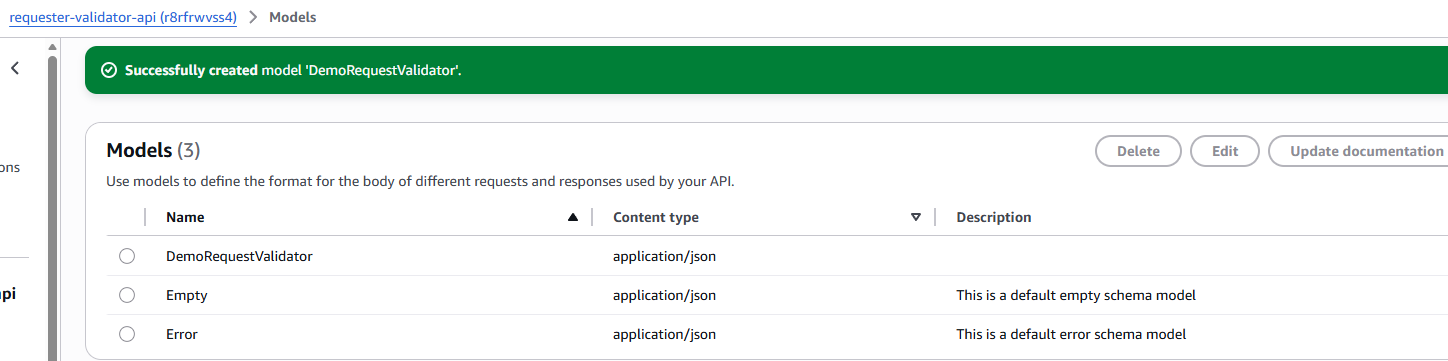
Edit integration request
Check Lambda proxy integration and select the lambda function you created" "
Save and Deploy API to a stage.
Copy the Invoke URL and paste it into Postman. In Body, choose raw and paste the JSON above. Click send.
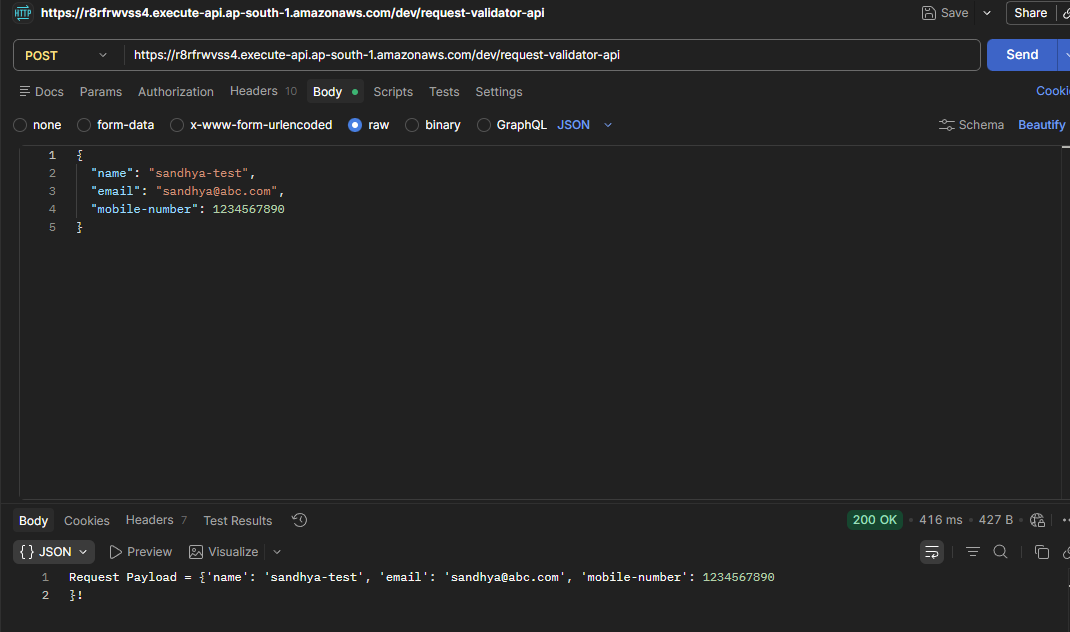
Let's test if it works as intended
Test 1 — Invalid email (removed @) email: "sandhyaabc.com" (not a valid email format)
Test 12— Extra digits in mobile number mobile-number: 12345678901 1(11 digits — exceeds maximum)
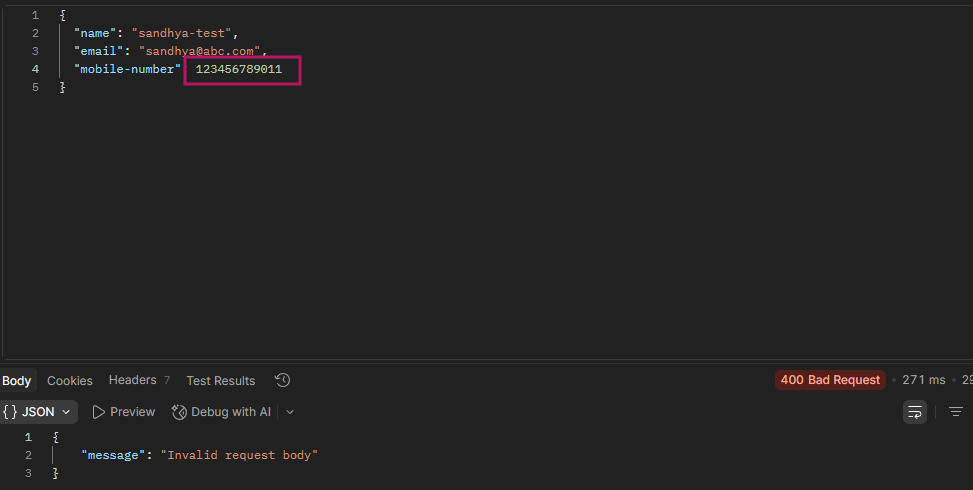
THAT'S THE VALIDATOR WORKING PERFECTLY! 🎉
